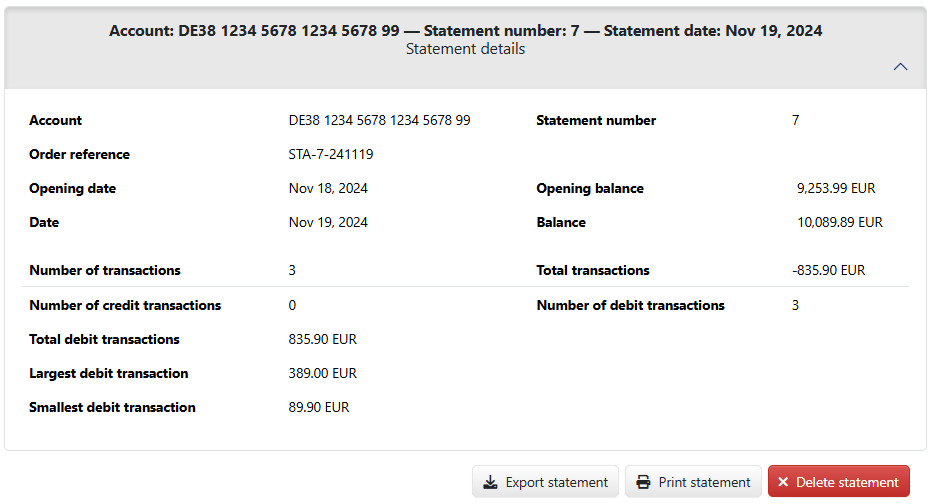
Figure: Area for account details
Users with the permission to view account statements can open this page by either selecting Account statements – Transactions from the main menu or by clicking on an account on the Account overview page as well as on the homepage in the area Balance lists. The overview of transactions is displayed accordingly for all or the previously selected account.
The overview shows the transactions according to the Navigation path. In the first drop-down list, you can select an account or a Account group, then a year and finally a single account statement. Only accounts with transactions are available. Years are only offered for accounts for which there are statements in several years.
If an account is set in the navigation path, an area with the details of the last or selected statement appears below it. The area can be expanded with a click to see all the details of the statement, e.g. the order reference, the number of transactions and the totals. You can execute actions for this statement using the buttons below the statement details. Actions for multiple statements can be found above the posting details.
These buttons are used to create a file that you can save in a directory of your choice. When exporting, you must select a format in a dialog box. Possible formats are the original format, a CSV file with a Conversion or a PDF file. The latter corresponds to printing.
Only users with the permission to delete account statements and PDF account statements will see this button. The action must be confirmed in a dialog box.

Figure: Area for account details
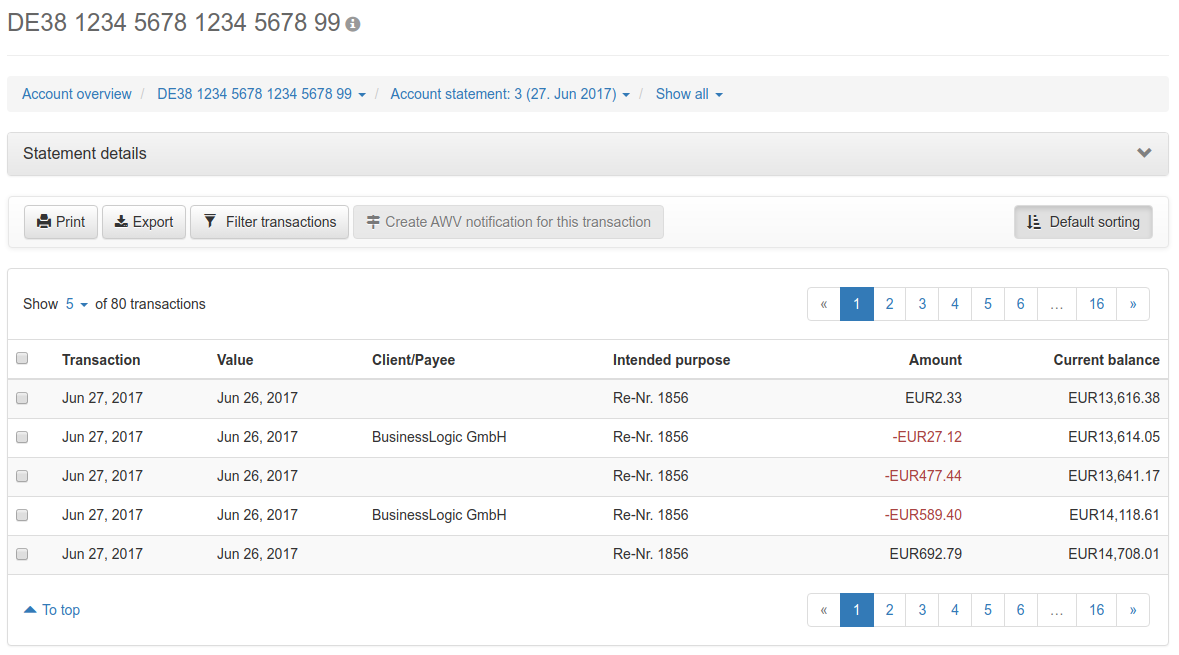
The overview under the statement details lists the individual transactions. The display is limited to 10,000 sales (across all pages). If there are more, the text Show … of more than 10.000 transactions appears above the first column. In this case, it is advisable to make a selection, e.g. using the navigation path or a filter.
The column Account with the name from the account settings is automatically displayed or hidden, depending on whether the overview refers to all accounts/a group or a specific account. You can display the additional column Account number/IBAN to see the details of the respective contra account. The columns Posting and Value contain dates. The column Current balance is automatically shown if the overview is displayed in the standard sorting; it is hidden in other sortings. A dash next to a posting date indicates that it is a reservation date from an advice. An exclamation mark appears in the column Indended purpose if it is a batched transaction. Click on the exclamation mark to open the page Batched transaction with the individual transactions.
You can view further posting details in a dialog box that opens when you click on a line. You can use the Back and Next buttons to scroll through all the transactions displayed on the current page of the overview without closing the dialog box. If necessary, adjust the number of sales displayed per page as described in the section User interface – Overviews.
Buttons are displayed directly above the overview with which you can perform actions for all or selected transactions. In addition to the navigation path and marking rows, you can also use the button Filter transactions to select transactions.
You can select rows and print them directly. Without marking, a dialog box opens in which you select whether all transactions or only those for a specific period should be printed. With the option All transactions, transactions from all screen pages are printed. The dialog box shows their total number. To limit the size of the print file, a maximum of 10,000 transactions are printed. If you specify a period, the printout also contains balances and totals as with the action Print statement in the statement details area. Otherwise, this button prints the transactions without the details of the account statement in a PDF file. Transactions from several accounts are printed in one PDF file for each and downloaded as a ZIP file.
This button opens a dialog box in which you can select or enter values in several fields in order to filter the overview according to content criteria. Values from the field Text can be located at various points in the transaction, e.g. in the intended purpose, recipient/originator or end-to-end reference. Upper and lower case are ignored, so the input Maier also finds MAIER. In a text, the percent sign can be used as a placeholder for one or more characters. The entry Salary%2025 for example, finds the texts Salary 2025, Salary 01/2025, Salary Jan-2025 etc. The drop-down list Type contains a range of different properties, some with an input field, e.g. Direct debit without and Posting key with input field.
Clicking on the button opens a dialog box in which the number of transactions to be exported is displayed for checking purposes. In contrast to action Export statement in the statement details area, you can only save the transactions as a PDF or CSV file here; the original format is not available. You can select a conversion from the drop-down list or switch to the page Conversions using the button New. After creating the desired conversion, the sales overview is displayed in the same view as before. If you click Export again, you can select the new conversion.
You can create AVW notifications directly here for reportable transactions. To do this, you must select at least one row and click on this button. The creation is reported in a green info bar. You can view the generated AWV notifications in the overview AWV report data and complete them from there.
You can create a SEPA transfer from any transaction, provided you have permission for the account. To do this, you must select one or more rows and click on this button. If several open payments have been created, the page Open payments opens, on which a green info bar informs you about the number of new open payments. If there is only one SEPA transfer, the page New SEPA credit transfer will open, where you can edit the data and save it as an open payment.
If an account is set in the navigation path, this button menu appears with actions specifically for this account. Descriptions of the actions Trigger automatic exports and Move to a group can be found in sections Account overview – Print and export and Account groups.
This action opens the page Edit account. You can view the account settings and also edit them as an administrator or manager. You can find further information in the section Account statements of the chapter Edit account.
Only users with the permission to delete account statements and PDF account statements see this action. If Display all years is set in the navigation path, all account statements from all years are deleted. If a specific year is selected there, all statements from this year are deleted. A statement selected in the navigation path is ignored. To delete only this statement, use the Delete statement button in the Statement details area. The process must be confirmed in a dialog box. After deletion, the deleted transactions are no longer displayed in the overview. If there are no more transactions for an account, the account will no longer appear in the navigation path.

Figure: Overview of transactions