Figure: New account group
In the account overview, you can organize the accounts for which statements are available into groups in order to filter the overview and, for example, print account statements by group. Unlike the filter action, which refers to existing account properties, you as a user can assign the group characteristic yourself. Actions for organizing account groups are available in the button menus Account group and More actions.
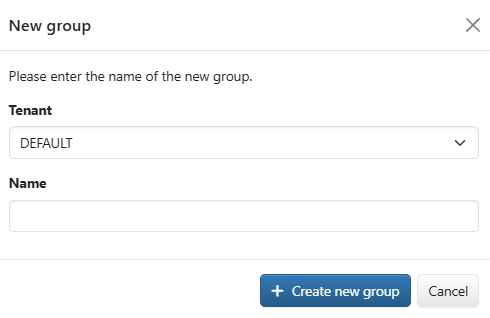
Select the action Create new group from one of the two button menus. In the following dialog window, assign the group to a tenant, depending on the intended accounts. In principle, a group can include all accounts of all banks in this tenant. If there is only one tenant, the tenant specification is omitted. Assign a name for the group that makes sense for all users. Upper and lower case letters are meaningful, e.g. there can be two groups Salary and SALARY. If existing, the name of the client is appended to the group name.
Select at least one account in the overview and choose the action Move to a group from the button menu More actions. In the following dialog box, select the desired account group from the drop-down list and confirm the assignment. If there are accounts in other tenants, a yellow info bar informs you that these are not assigned. Accounts that were already assigned to a group are assigned to the new one. To remove the group assignment for all selected accounts, select the entry (No account group) from the drop-down list.
Groups that you have created and assignments that you have made are available to all users with the same banks and can be edited or dissolved by them.
Expand the button menu Account group in the overview. Several entries appear, separated by dashes. The first area contains the predefined filters, All accounts for accounts with and without a group and Accounts without account group. The names of the groups that you or other users have created are displayed below this. Select an entry to filter the overview to the accounts of one group. A selected group remains selected until you change the selection. Your selection has no effect on other users.
To edit an account group, you must first select it from the button menu Account group. If you open the button menu again, additional actions are available, Rename and Dissolve, which each open a dialog box. To rename, change the name entry in the field. The tenant cannot be changed. If the group was created for the wrong tenant, you must delete the group and create a new one. You must confirm the action Dissolve in a dialog box. The group assignment of the accounts contained is set to (No account group). The dissolution of the group has no effect on the account statements of the assigned accounts.
The group assignment is displayed in the account settings on the tab Account statements. An administrator or manager can also assign a group there, change or revoke an existing assignment. You can find a description of this tab under Settings – Accounts – Account statements.
Figure: New account group