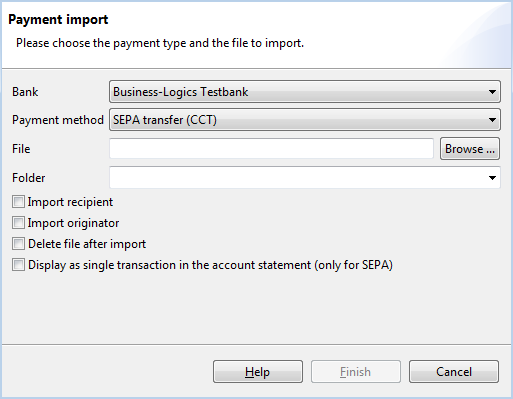
Figure: Dialog box for importing a payment file
You can use fully processed payment files in order to import the individual bookings contained in these for processing in BL Banking. Furthermore you can also extract the recipients and originators from the payment files. After the import, the payments contained in the imported file are displayed in the Open payments overview.
Here, you can select the bank that is designated for the file to be imported.
Select the payment method that corresponds to the format of the file to be imported. In addition to the payment method, the order type is specified in the drop-down list. You can find a list of typical order types in the appendix under Order types. In the user profile you can check if you have the permissions for the required order type. See section Bank properties - User profile.
Enter the path and filename of the file to be imported. By clicking the Browse button, the dialog box of your operating system opens, which you can use to navigate to the file on your local or network drive.
It is also possible to import payments, which are not available as a file in original format, but as a CSV or Excel table. This will then be converted to the desired format during the import process. To do this, select the desired payment method and enter the existing file in this field. After that, a dialog box is opened, where you can assign the columns of the original file to the payment fields. You can find a description for this in the section Convert payment.
If you have created folders in the overview Open payments, you can select one of them here, in which the imported file will be stored.
Mark these checkboxes if you plan to not only apply the payments but also the master data contained in the these. Also refer to the sections Originators and Recipients.
If this check box is set, the file is deleted from your local or network drive after the import.
Principally banks provide payments from a SEPA file only combined as a batched transaction in the account statement. If you want to see the payments in the file to be imported as separate transactions in the account statement, please activate the checkbox.

Figure: Dialog box for importing a payment file
The file is imported after clicking on Finish, followed by a dialog box that confirms the number of imported payments.
If the imported file contains an unknown originator account, a dialog box is displayed giving you the option to substitute this account. You can then select one of the installed originator accounts from the Accounts drop-down list, and import the payment file with the substituted account. Alternatively, you can also cancel the import.
Please also note that salary payments are not imported unless this is configured accordingly in the preferences. For this also see chapter General - Preferences - General - Payments.