Figure: Recipient overview with context menu
As already described in the Originators section, recipients can also be transferred as master data while entering or importing payments. Recipients can also be entered individually or imported from external files.
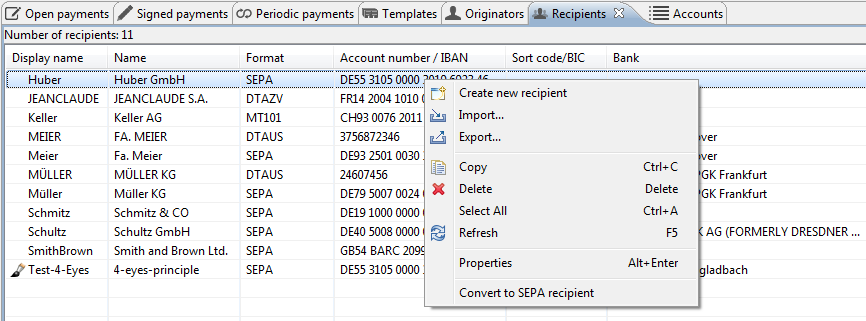
The recipients saved in BL Banking are displayed in an overview showing the most important data. The column on the far left shows the Display name which you can assign for all types of recipients, for instance to enter several bank connections for the same recipient. This name is not transmitted to the bank but is only used internally.
In the upper right corner of the tab there is a button that opens the Recipient filter window. There you can enter a search term to filter the displayed recipients.
If a recipient is marked with a brush symbol in the left column of the overview, it has yet to be confirmed by another user. For more information about this see the section Confirm recipient.
Figure: Recipient overview with context menu
The context menu can be used to enter or import a recipient and also to access the following additional functions.
You can retroactively edit already entered recipients by double-clicking or highlighting these and selecting Properties from the context menu. Alternatively, you can also reach this item from the Edit menu or by pressing the Alt+Enter keyboard combination. You are then forwarded to the same dialog boxes that you used to enter the recipient and which are described in the sections under Record recipient.
If you had selected a recipient, which is marked with a brush icon in the overview, and another user has entered this recipient, the dialog box for confirming appears. See the section Confirm recipient for this.
Using the menu item Convert to SEPA recipient one or multiple recipients of the formats DTAUS, DTAZV and CFONB can be converted into SEPA recipients.
With this function the marked recipients are exported into a CSV file.
This menu item is used to highlight all lines in the overview.. This function can also be accessed via the Edit menu or the Ctrl+A keyboard combination.
You can delete one or several previously highlighted recipients using the keyboard, the toolbar, or the menu. You are prompted to confirm the transaction in an pop-up dialog box to prevent inadvertent deletions.
This function is similar to the one described in section Open payments, however here a recipient cannot be copied into the overview itself, but only into another program.
This function matches the one described in section Open payments.