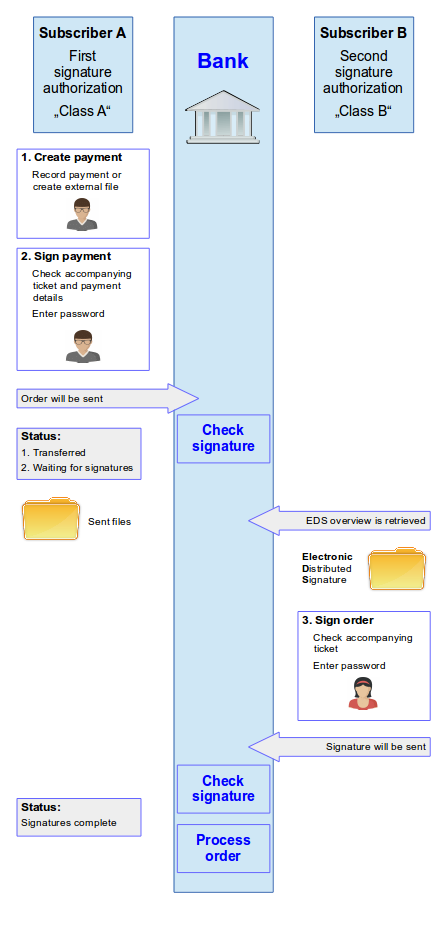
BL Banking allows to record and submit payments and sign them with the electronic distributed signature. This normally requires two users, one of which records the payment, signs it, and transmits it to the bank. The other user adds the second signature, after which the order will be processed by the bank. The following sketch provides an overview of the process and the parties involved.
To record a payment, please first switch into the Payments perspective by clicking the Payments button below the toolbar. Then select New from the File menu and from there the desired payment type. This selection you can also call up from the toolbar or the context menu.

After selecting the desired payment type, the dialog box for the entry of the payment appears. During the entry you are informed, which mandatory fields still need to be filled in. The accounts, originators and recipients, which can be selected from the drop-down lists, are managed each in their own tab within the Payments perspective. Originators and recipients must be entered by yourself, whereas the accounts are submitted by the banks.
After you have entered the payment, it is ready for signature in the Open payments tab. Before signing you can still change the payment by opening it with a double-click. If you have entered or imported multiple payments, and want to change the execution date for all of them together, mark these payments and select Change of the execution date from the context menu.
You can sign payments separately or sign previously entered or imported payments together. To do this mark the payment/s and then click on Sign in the Actions menu or in the context menu. Alternatively you can also click the button on the toolbar or press Alt+U on the keyboard.

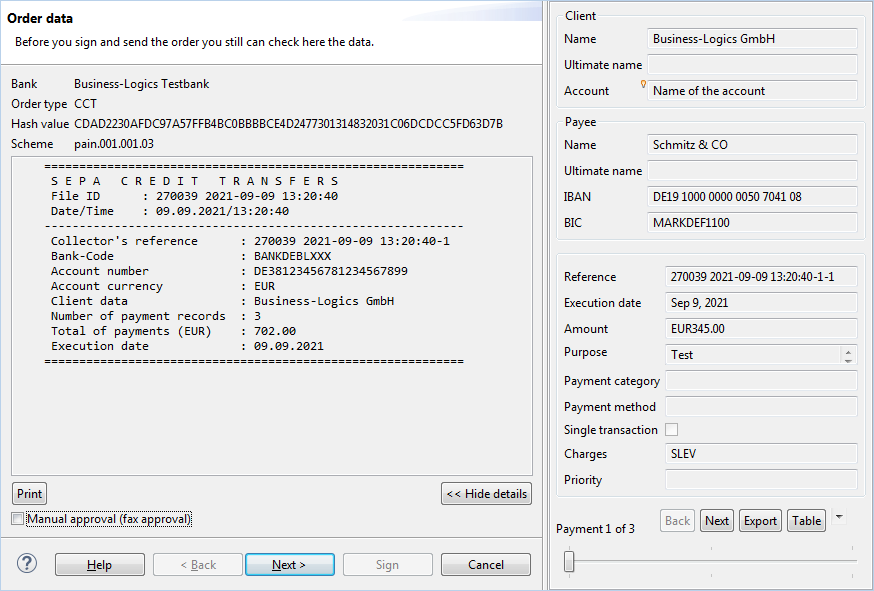
After clicking on Sign, the accompanying ticket is displayed. Using the Display details button you can view the details of the order. If the order contains multiple payments, you can page through them. If you sign multiple payments with different order types or originator banks together, multiple accompanying tickets are displayed in the same window, through which you need to page, until the Sign button is activated.
After clicking the Sign button, enter the same password that you use to log on, when you start BL Banking. After that, all signed payment are sent to the bank in one order.
If you have ready payment files, e.g. from your financial accounting software, you can send them directly to the bank. To do so, click the green arrow up in the toolbar or select the item Send file to bank from the Actions menu.
In the following dialog box, first select the bank, where you want to send the file, as well as the order type, e.g. CCT for a SEPA transfer. By clicking on the Search button the file dialog appears, which allows you to specify the payment file stored on your computer.
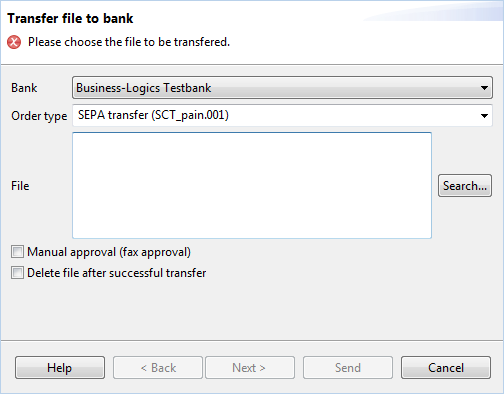
Instead on the green arrow, for SEPA files you can also click the Euro symbol. Then you only need to specify the file, while the program tries to read the other information from the file.
After clicking Send the accompanying ticket is displayed. Everything else is carried out like when signing open payments.
After signing, the order appears in the overview Sent files under the Jobs perspective. There it usually has the status Transferred first. If you need another signature for to release the order, the status is changed to Wait for signatures after refreshing the overview. Furthermore, for the second person authorized to provide a signature, the order appears in the overview Electronic distributed signature. After the order was signed there, and the overview was refreshed here, the status changes to Signatures complete.
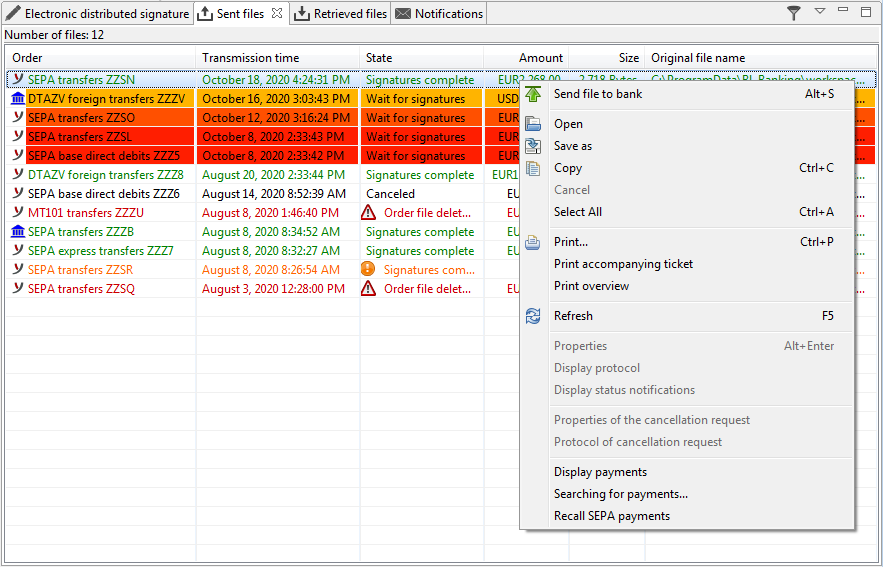
By right-clicking a line in the overview and selecting the menu item Display protocol you will see the protocol sent by the bank with information about the processing of the order. This can be particularly helpful if the order was rejected by the bank, and thus the status is Error. This can occur, for example, when signature authorizations are missing. In the protocol you can find details on the cause of the error.
You can call up the transmission report using the menu item Print. Inside there you will see the accompanying ticket, the protocol and the data of the payments contained in the order.
It should be noted that multiple payments, which were signed together, appear individually in the overview Signed payments. However, if the order type and originator bank are the same for all payments, they are sent to the bank and displayed in the overview Sent files as one single order.
If an order was submitted to the bank with a single signature authorization (class E), it is posted by the bank immediately. Otherwise, it must be signed by another person authorized to provide a signature. He is logged on as another user to BL Banking and has initialized his bank connection with a different user ID. His computer can be located at any place.
Out there, the order to be signed is displayed in the overview Electronic distributed signature in the Jobs perspective. As the case may be, the user over there needs to refresh the overview to retrieve orders on hand at the bank. These are marked with a brush symbol in the overview and can be signed.
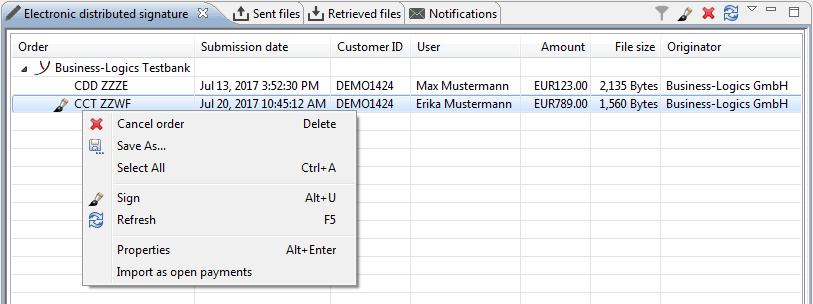
At the lower end of the overview, there are the three tabs Open, Signed and Rejected. After signing, the payments disappear in the view Open and appear in Signed. For the user, who submitted the payment, the status of the payment changes to Signatures complete after refreshing.
Payments - Open payments - Sign payment