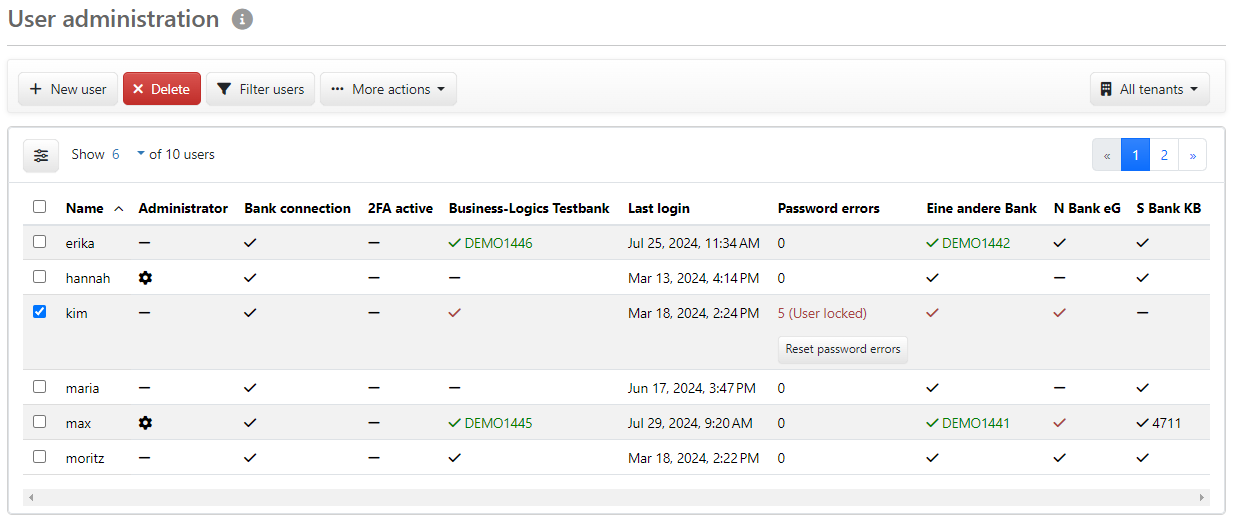
Figure: Overview of the users
The server-based application is intended for operation with multiple users. In the user administration, administrators and managers of tenants can add, edit and delete users. Users without administrative permissions do not have access to the user administration.
The overview displays the users with the following information:
The error column also records login locks. These can be triggered by too many failed attempts by the user. In this case the text User locked appears next to the counter and the type of entry, login or signature, appears in a tooltip. The number of permitted attempts is regulated by the password requirements. You can also set a login lock manually if you want to prevent a user from logging in. The text User locked by administrator then appears here. In both cases, you can allow the user to log in again by clicking on the button Reset below the text. The user's old password will be retained, as well as his bank connections.
The columns further to the right in the overview contain the banks that are available or assigned to a selected tenant. A check mark appears if the bank visible to the user, otherwise a dash. Next to the check mark is the subscriber ID of the user at the bank. This is missing if the user does not have a bank connection. The font color indicates the state of the bank connection: black – activated/not initialized, green – ready, red – deactivated/locked. The designation of the state on the bank side is shown in a tooltip.
Clicking this button opens the page Add user. If there are several tenants in the system, you must first assign one or more tenants on a selection page. As an administrator, you can assign all tenants that exist in the system and change this later in the tenant administration. As a manager, you can only assign the tenants that you manage and cannot change the assignment later. When making your selection, note whether a subscriber limit applies to one or more tenants. If the limit is exceeded, the tenant can only accept users without bank connection.
Select one or more users in the overview that you want to delete and confirm the process in a dialog box. Data entered by the user is retained, open payments are displayed with an unknown creator. You cannot delete the user under which you are logged in.
The button opens a dialog box in which you can enter a filter term for displaying the overview. A filter term must consist of at least one character, the input is not case-sensitive. The active filter is displayed in a yellow info bar and can be deactivated there.
The filter term can be found in the user name, the subscriber ID, the customer ID of a bank or in the name of a tenant. It is not possible to limit the filter to a specific parameter. For a useful result, it is therefore advisable to filter for complete terms, e.g. full names. If you filter using the (complete) customer ID of a bank, users with a dash in the bank column are hidden. You can see the customer ID of the banks in the tooltip for the column heading. For focused filtering by the name of a Tenant, there is a separate button.
There is an action for exports in the menu More actions, generating a CSV file from the current view. Where appropriate, select a tenant and a filter before exporting or reset both. Save the file with the extension .CSV in the target directory. The file sets the banks in relation to the users. The subscriber IDs and the states at the banks are given.
The actions Reset user password, Dublicate user and Lock login are located in the menu More actions as well as on the Edit page. A description can be found there. Another action, Import user, is described separately. Duplicating and importing users are both alternatives to adding.
Figure: Overview of the users