Database migration
BL Banking stores sent and retrieved files etc, in the workspace directory. For performance reasons, a database is also used for the application data. Since version 1.10, BL Banking has been supplied with a simple H2 database in version 1.3.176, which is installed locally as part of the program installation so that you can start working with BL Banking immediately.
External database
For most installations, the H2 database is not sufficient in the long term, especially for a network installation. You should therefore use one of the following databases in the latest version instead. Follow the links to obtain product information and installation files.
Set up database
The external database must first be set up independently of BL Banking on a database server, not on a workstation computer. The following steps outline the process in broad terms; details can be found in the documentation provided by the respective manufacturer. Please note that manufacturers offer different editions of their databases, including fee-based editions. Consult your in-house IT department, which manages the database server, for selection and installation.
- Download the setup program from the manufacturer of your choice for the operating system of your database server.
- Start the setup on the database server.
- During installation, specify the following: installation directory, data directory, components (at least the server component and an operating terminal), port number, password for the database user, location parameters if required, etc.
- Start the server component.
- Create a new database for BL Banking.
- Configure the new database for external access.
- Open the database port for incoming connections in the server's firewall.
After set up, the external database is ready for migration and can be accessed from the BL Banking workstation.
Database migration
After setting up the external database, you can migrate the data from the H2 database to the new database in BL Banking. The new database must be empty, otherwise existing data will be overwritten. The duration of a migration depends on the amount of data.
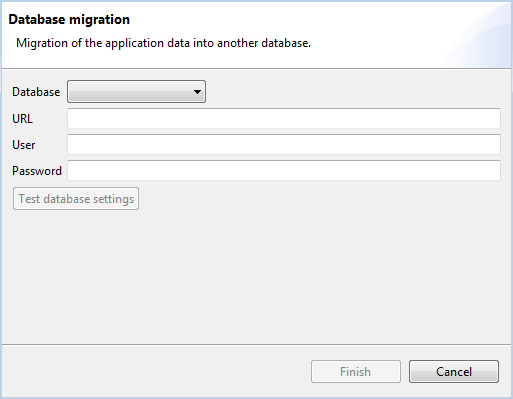
- Open the entry System Settings from the menu Edit and then open the page Database. The used H2 database, its URL, and DB user are displayed grayed out.
- Click on the button Migrate application data to different database.
- Select your new database in the following dialog box. The URL pattern is pre-filled as shown in the figure. Replace the variables in angle brackets with the values from your installation and, if necessary, the port number under which the database is accessible.
- Enter the name and password of the database user.
- Click the button Test database settings. Wait until the result of the connection check is displayed at the top of the dialog box.
- After successful testing, click Finish. The migration will start. Wait until the process is complete without closing the dialog box. Cancelling the process may result in data loss.
You can continue working immediately after migration. From now on, the database server must always be accessible while working with BL Banking.
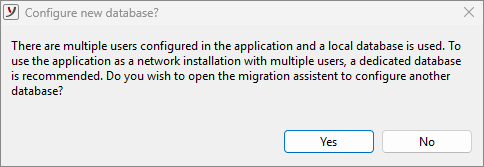
Database migration when creating users
If you use BL Banking in a single-user installation with a local H2 database and then create another user, you will be prompted to migrate the database.
- Selecting Yes opens the dialog box described above for the Database migration.
- Selecting No switches the local H2 database to network mode. This transforms a single-user installation into a Network installation and your work computer becomes a database server.
After switching the H2 database to network mode, the old workspace directory is backed up under the name backup_DATE_TIME.zip.
H2 database server
By default, the bundled H2 database is integrated into the BL Banking installation as a local database. Alternatively, you have the option to install an H2 server as a service. The setup program for the BL Banking H2 Server (version 1.3.176) is available on the Business-Logics website.
- Download the setup program for Windows here: H2 Server (64-bit). A 32-bit version is available here: H2 Server (32-bit) (outdated).
- Exit BL Banking.
- Starten Sie das Setup-Programm. Ein Installationsassistent führt Sie durch die notwendigen Schritte.
- Erfassen Sie den Zielordner, in den H2-Server installiert werden soll.
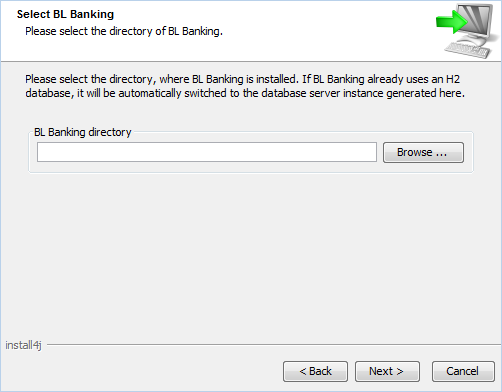
- Enter the directory where BL Banking is installed, e.g. T:\blbanking.
- The IP address of the computer is suggested, e.g., 192.168.1.1. The BL Banking H2 Server will be accessible on the internal network at this address from now on.
- After entering the IP address, the installation process begins. Next, click Finish. The H2 Server is automatically started as a service and the H2 database is moved from the specified BL Banking directory to the new H2 directory.
When you start BL Banking now, you do not need to change anything. The newly installed H2 Server will be used automatically. The changed URL is displayed on the Database page in the system settings.
Related chapters
General - Installation - Installation scenarios
General - System settings - Database