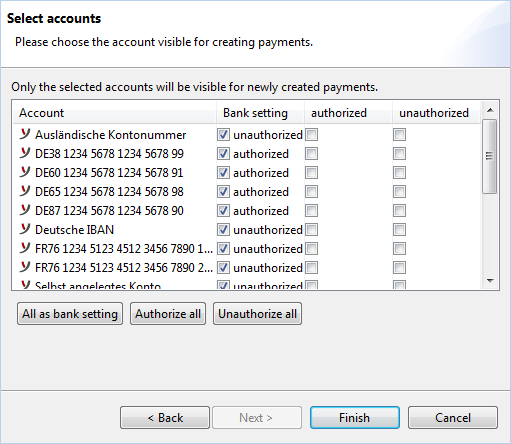
This dialog box is the third and final one that is part of creating or editing a user. It displays the bank connections that you assigned to the user in the previous step. You can use the Back button to return to the bank selection if necessary. Accounts and user permissions are usually provided directly by the bank, but they can also be assigned locally. The user requires permission for payments, but not for account statements by default. You can configure whether account permissions are evaluated for account statements in the System settings under Account information – Display settings.
In the user administration, you can also edit the Account permissions for all users at once.
The dialog box for one user contains the following columns to set permissions:
The state from the bank is automatically updated after initialization and receipt of the user profile via HTD. A checkbox next to the text, with or without a checkmark, indicates whether the state from the bank is currently valid.
If the account was not provided by the bank but was created or imported in BL Banking, the column only contains the text No HTD account.
For an HTD account, you can modify the authorization assigned by the bank locally. This may be necessary if the bank’s authorization is not transmitted via HTD, or is transmitted incorrectly. Setting a local authorization also changes the checkbox in the column Bank setting.
For non-HTD accounts, unauthorized is preselected. Select all non-HTD accounts as authorized that the selected user shall see in payment recording.
To grant permission for all accounts at once, click one of the buttons below.
If, for example, you want the user to have the permissions assigned by the bank for all HTD accounts and to have permission for all others, click Authorize all first and then All as bank setting.
If you import accounts or create them locally at a later time, existing users will automatically be granted permissions for them.
The dialog box may be confusing because it displays too many accounts, which are not all relevant. Here, in addition to currently used accounts, you can see all accounts that have ever been created or imported but have already been deleted from the Account overview in the perspective Account statements or from the Accounts tab in the perspective Payments.
To narrow down the results, click the button Filter accounts below the table. In the dialog box that appears, enter a text string that is common to the accounts you are looking for. The text can appear in the name or another account attribute, such as the IBAN or the account holder's name. However, the filter cannot be based on technical characteristics such as Account with foreign account number or HTD account.
Click OK to apply the filter. Only the matching accounts are displayed, and the other buttons only affect this selection. The filter criteria, the total number, and the number of filtered accounts are displayed in the dialog box.
To clear the filtered view, click the button again and then click the Reset button under Filter accounts. This also clears the filter text. The next time you open the account permissions, all accounts are displayed again anyway.
Click this button to return to the window User administration. Changes take effect without requiring a restart. If you reset a previously revoked permission to Bank setting, the bank details must be updated. If you revoke a user's permission for an account, it is removed from his user profile in the BL Banking bank settings. If the user is an administrator, they can still manage the account for themselves and other users.
To create accounts in BL Banking, see Payments – Accounts to import account statements containing unknown accounts, see Account statements – Import.
Figure: Account permissions