Figure: Transaction window for creating a new automatic export
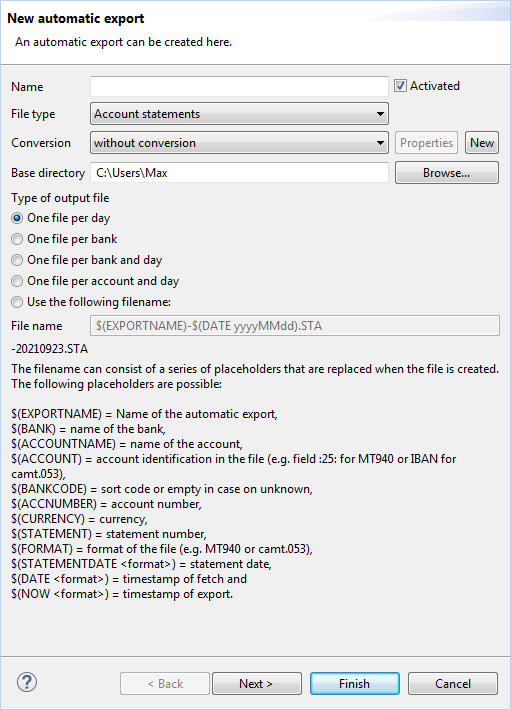
Using this function, account information are exported automatically as soon as they were retrieved from the bank. Here you can create a new automatic export and also edit an existing one. The window title is then either New automatic export or Change of an automatic export and the fields are either empty or completed with the values of selected settings. Account information includes statements, advices and batched transaction files.
Enter the name for an automatic export. Since you can create several automatic exports, this name helps with the identification. The name is also used for the output file.
An automatic export can be created and saved, in order to be used later for a specific need. In such a case, the checkboxes would be deselected, causing the export to be not performed. One can activate the export at an arbitrary point in time by setting the checkbox.
Select the type of account information, which you want to export: account statements, advices or batched transaction files.
During the export, you have the option to either save the account information in its original format or to convert it into another format. If you select without conversion, it is saved without modification. By choosing Create PDF file it is exported as a PDF file. Then, the print settings from the preferences are used. By selecting another entry from the drop-down list, it is converted into the CSV format. Please see the section Conversion.
The dialog box Change of a conversion opens which you can use to review and also edit the selected conversion. Click on Finish to accept your changes.
A dialog box New conversion opens which you can use to create a new conversion. Complete the fields and click on Finish.
Enter an existing folder where the export file will be stored. Clicking on the Browse button opens the file window of your operating system, which simplifies selecting the folder. You can select any folder on your computer or local network to which you have write access.
This radio button is used to determine whether and how to split the export data into several files. The following pre-configured settings are available for this:
The option Use the following filename is used to enter a free format filename into the data entry field below.
The filename is formatted using the placeholders shown in the bottom portion of the section. The placeholders are displayed for the pre-configured settings, but these are not editable. You can see the resulting filename as a preview below.
If you selected the Use the following filename option above, you can arbitrarily insert the placeholders and add explanatory text. You can also use the delimiting character for path formatting (the backslash \ in Windows) to automatically create folders during export. This is illustrated in the following example.
$(EXPORTNAME)\$(DATE yyyy)\$(DATE MM)\$(DATE dd)\Acc-No_$(ACCOUNT).csv
In this example, a folder is created for export name, year, month, and day and the account name is used as a filename with a prefix.
Figure: Transaction window for creating a new automatic export
The filename can consist of several placeholders that are correspondingly set when the file is created. The following placeholders are available:
When entering a date, replace the entry <format> with an expression, such as $(DATE yyyyMMdd) for 20130417, $(DATE d. MMMM yyyy) for 5. April 2013 or $(DATE dd.MM.yyyy) for 15.04.2013. For a complete description of the formatting, see the Java documentation on the page SimpleDateFormat.
In the default setting, the statements of all set up accounts are exported. After clicking on Next the second window of the wizard appears, on which you can select the accounts, for which statements shall be exported.